Pages

Showing posts with label diy. Show all posts

Monday, September 2, 2013

Deku Shield DIY: Part 1

So seeing as how it's already September and both kids want Halloween costumes that I know I won't be able to find in stores (at least not without paying ridiculously huge amounts of money), I'm getting started on their costumes. They want to be Link and Zelda, at least for now, and honestly if they change their minds, tough, I'm not making a new costume! I myself decided they're going to be the younger Link and Zelda from Ocarina of Time. Mostly because those look like the simplest to make.


So I'm starting off with the Deku shield, because paper mache is fun!

The basics

I started with a cardboard box I dug out of the garage. It happens to be an extra sturdy box with two layers of corrugation, but I have no doubt that a regular box would do just fine. I made a rough sketch of the shape of the shield, and cut that sucker out.

Basic Deku Shield Cutout
Then I realized I got the shape pretty wrong, but I really didn't feel like cutting out another one. That extra thick cardboard is kind of a pain to slice through. Anyway, it's just for Halloween, it's shape is still recognizable, and I doubt there's anyone mean enough to be making snide remarks at an adorable four year old.

Since having a flat cutout like that would look too much like a flat cardboard cutout, I bent it a bit to give it a curve.

The pencil's just there because apparently my camera can't focus on cardboard.
That's the inside of the curve. I bent it gently so that the creases would only be in the inside, and only a couple bends show on the outside at all, and they'll be covered with paper mache.

I used one of the flaps from the box cut about 3/4 of an inch shorter than the width of the shield to hold the curve, and give me somewhere to attach the straps later.


A couple strips of duct tape will hold that on nicely for me.

See? The difference is subtle, but it looks a lot better now.
I covered that in a couple layers of paper mache, let that dry, and did another vertical layer with the newspaper ripped into pointy bits. I was hoping that this would give it a tree bark texture, but the newspaper is pretty thin. I'm thinking I'll do a similar layer with paper towels torn into points and see if that looks any better. I'm not sure how I'll add the texture to make the red swirl look carved out, or if it's even worth bothering, but I'll be thinking about that too.

Thursday, August 1, 2013

Knit Cashmere Dice Bag

I knit this dice bag about a year ago from some cashmere I got from a thrifted sweater.


This yarn is probably my most exciting thrift store find ever. 100% cashmere sweater, lovely crocheted seams (rather than serged), and originally very pale pink.


I dyed the bag with kool aid. Unfortunately I forget exactly what I used, but I'm pretty sure I used cherry flavored, with just a pinch of grape to get that dark blood-soaked color one needs as a barbarian.


I was afraid the cashmere wouldn't hold up very well, being a rather delicate fiber and all, but other than a bit of pilling around the drawstring it's held up just fine.

Monday, July 29, 2013

Hand-Printed Fabric

I've been trying to figure out a way to jazz up the basic totes I make, and came across this post by Dana at danamadeit.com. She simply painted fabric with acrylic paint, without even using a textile medium. According to various other sources I found via google, latex paint works as well as acrylic when mixed with textile medium, but I don't have any textile medium, don't feel like making the trip to the craft store, and don't really have any room in the budget to buy any anyway. I figure since the textile medium is mostly for making the paint more flexible and comfortable on clothing, it wouldn't be too terrible to leave it out for a tote bag.

Thus, I pulled out a quart of "electric orange" latex paint. It's been sitting in the cupboard for... oh... 12 or 13 years now. I got it originally to sponge over the red walls in my bedroom. I was a weird kid.


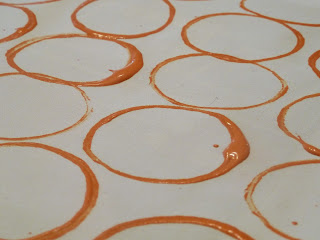
I cut out the fabric, a 100% cotton recycled bedsheet, and laid it out on some newspapers. I used the toilet paper roll to stamp the fabric, and the old container lids to hold the paint. (Side note: am I the only one who saves sour cream and yogurt containers, but somehow ends up with twice as many lids as containers?)


See those little speckles around the circles? That's because I just dipped the TP roll in the big lid full of paint and stamped away. Thus, every time I lifted the roll little droplets of paint would pop off. So I started dipping the roll in the paint, then tapping it on the empty lid before stamping a couple times. Lather, rinse, repeat.

I like how I got impatient and rushed and the circles on the left are getting thicker and messier. There's even a couple super thick blobs:

Which actually thinned out quite a bit when they dried, but are still pretty blobby. Eh, well. I still need to see how it holds up to washing/drying/using/washing/etc. And if it works, I'll be more careful to keep things even if I do it again. I kind of like the way it's not all nice an even though. 

I'm also noticing that I really need to work on my photography. Proper lighting is really hard in my house; we have lots of trees, and not huge windows, so natural light is in very short supply, even in the summer.

After drying I went to iron the paint and found a little happy face.
Children have been here.
Ah, well, such is life. I actually kind of wish it had been a circle closer to the center, this one is probably going to get mostly lost in the hemming and sewing of the tote. And it'll be upside-down...

Anyway, iron on highish heat, use an ironing cloth or a bit of scrap between the iron and the paint. I used a bit of newspaper, and where the paint is thicker the newsprint stuck in the paint like silly putty. I'll see if it washes off, but if it doesn't, again, no big deal.

And that's how you use latex paint on fabric. I'll do another post with the finished tote bag later, too.